Starting the Hair
Starting the Hair
I decided
to make a start on the hair for my character before I had fully finished my
character sculpt as I hadn't really made realistic looking hair before so I had
a lot to learn, and I would rather spend the time to work out an effective
pipeline sooner rather than later to give me time to work out all of the kinks
and get some good results.
I collated
a moodboard of the sort of hair style I wanted my character to have. I found
hair styling videos on Youtube to be a good source as they showed multiple views
of a haircut.
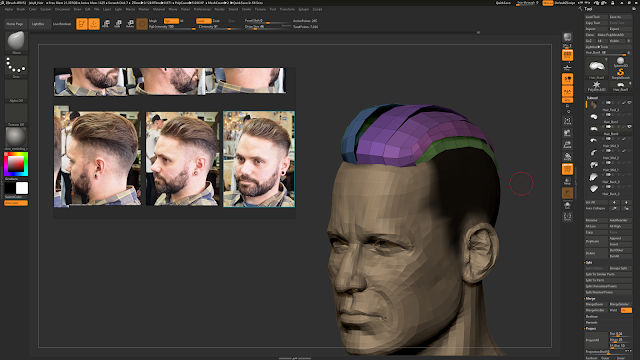
Below is a
selection of images from one hairstyle I like in particular:

I started
off by learning Maya's XGen to create the hair clumps which will be used to
obtain the textures for the hair cards. Then, I started placing cards manually
using the technique by Tom parker, found
here: https://www.3dartistonline.com/news/2015/04/how-do-i-create-real-time-hair-for-games/
The
technique utilises the use of the IMM feature in ZBrush, which allows hair
cards to be drawn out onto a mesh along a curve, which can then be adjusted
before applying. I chose to manually place the cards in ZBrush it allowed
artistic freedom and I am comfortable with the controls and I prefer to use a
tablet to place the hair cards. I used GoZ to export out the head and cards to
an external modelling package such as Maya or 3DS Max. This allowed me to apply
alpha materials on the hair cards to check how they were looking. It also gave
me the chance to fine tune the placement.
Placing and
shaping hair curve guides in XGen:

Hair strand
instances with Maya's Hair Physical Shader applied:

Rendered hair beauty texture using Arnold:

Begining
hair card placement using IMM Brush in ZBrush:

Using
Polygroups in ZBrush to allow more control when moving individual hair cards:
I painted a
hair cap to show hair line and borders to help when placing hair.
Hair and
head model exported to Max through GoZ:

Although
adding the hair material to the cards inside 3DS Max gave me an idea of how the
hair would look, I thought it would be beneficial to see how the hair
would look in-engine as this is what I will be using to render my final
product.
I decided
to use Unreal's hair shader that was already included as it gave me good
looking results and was quick to setup.
Before I
could use Unreal Engine's hair shader, I first had to create some more maps
from the XGen hair geometry in order to fully utilise the shader.
I found
this tutorial: https://www.youtube.com/watch?v=_BSlDfF-Iys by Andrew
Giovannini extremely helpful as it gave a step by step guide on how to create
the required maps using xNormal.
The below
are the extra maps that were created:

Then,
inside Unreal, it was just a case of duplicating the existing master material
used in the Photorealistic Character scene and replacing the 'Bottom Layer'
textures with my own in the material editor.

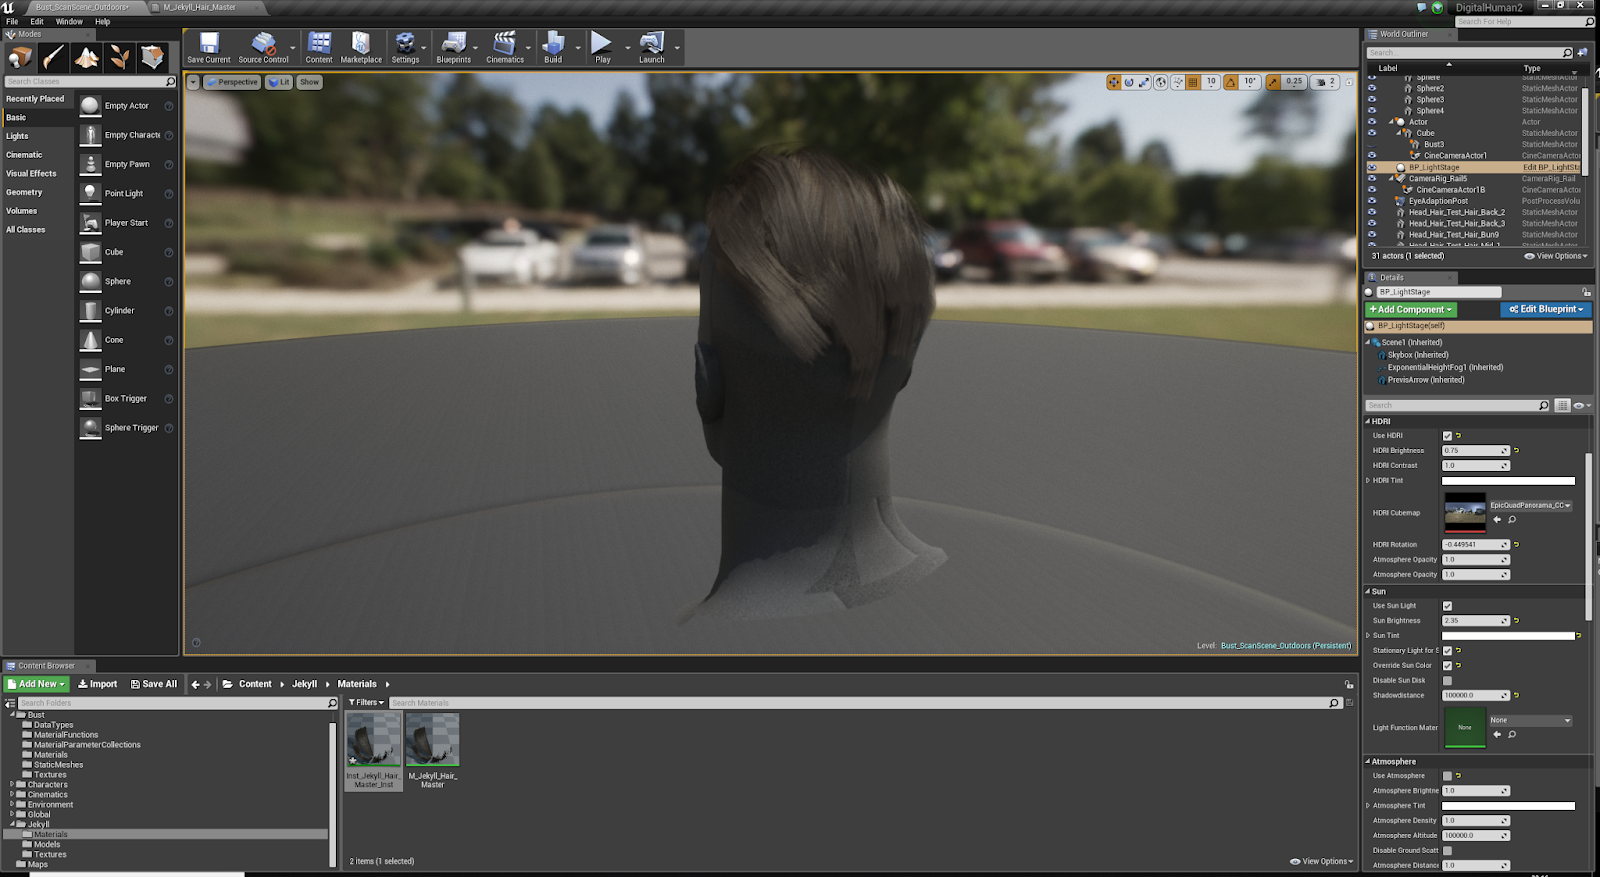
Below are
some in-engine screenshots of my initial hair placement. I plan on
tweaking values a lot more in order to get the desired look.


I decided
to make a start on the hair for my character before I had fully finished my
character sculpt as I hadn't really made realistic looking hair before so I had
a lot to learn, and I would rather spend the time to work out an effective
pipeline sooner rather than later to give me time to work out all of the kinks
and get some good results.
I collated
a moodboard of the sort of hair style I wanted my character to have. I found
hair styling videos on Youtube to be a good source as they showed multiple views
of a haircut.
Below is a
selection of images from one hairstyle I like in particular:
I started
off by learning Maya's XGen to create the hair clumps which will be used to
obtain the textures for the hair cards. Then, I started placing cards manually
using the technique by Tom parker, found
here: https://www.3dartistonline.com/news/2015/04/how-do-i-create-real-time-hair-for-games/
The
technique utilises the use of the IMM feature in ZBrush, which allows hair
cards to be drawn out onto a mesh along a curve, which can then be adjusted
before applying. I chose to manually place the cards in ZBrush it allowed
artistic freedom and I am comfortable with the controls and I prefer to use a
tablet to place the hair cards. I used GoZ to export out the head and cards to
an external modelling package such as Maya or 3DS Max. This allowed me to apply
alpha materials on the hair cards to check how they were looking. It also gave
me the chance to fine tune the placement.
Placing and
shaping hair curve guides in XGen:
Hair strand
instances with Maya's Hair Physical Shader applied:
Rendered hair beauty texture using Arnold:
Begining
hair card placement using IMM Brush in ZBrush:
Using
Polygroups in ZBrush to allow more control when moving individual hair cards:
I painted a
hair cap to show hair line and borders to help when placing hair.
Hair and
head model exported to Max through GoZ:
Although
adding the hair material to the cards inside 3DS Max gave me an idea of how the
hair would look, I thought it would be beneficial to see how the hair
would look in-engine as this is what I will be using to render my final
product.
I decided
to use Unreal's hair shader that was already included as it gave me good
looking results and was quick to setup.
Before I
could use Unreal Engine's hair shader, I first had to create some more maps
from the XGen hair geometry in order to fully utilise the shader.
I found
this tutorial: https://www.youtube.com/watch?v=_BSlDfF-Iys by Andrew
Giovannini extremely helpful as it gave a step by step guide on how to create
the required maps using xNormal.
The below
are the extra maps that were created:
Then,
inside Unreal, it was just a case of duplicating the existing master material
used in the Photorealistic Character scene and replacing the 'Bottom Layer'
textures with my own in the material editor.

Below are
some in-engine screenshots of my initial hair placement. I plan on
tweaking values a lot more in order to get the desired look.


Comments
Post a Comment