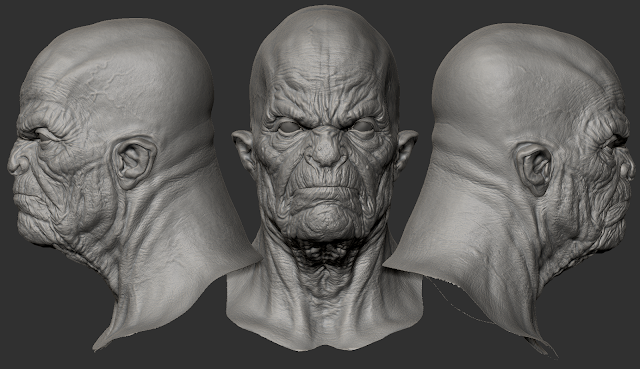
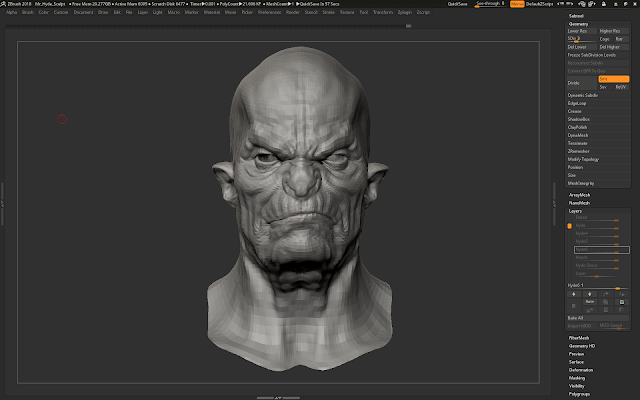
Posts

Hyde Texture Start

Image
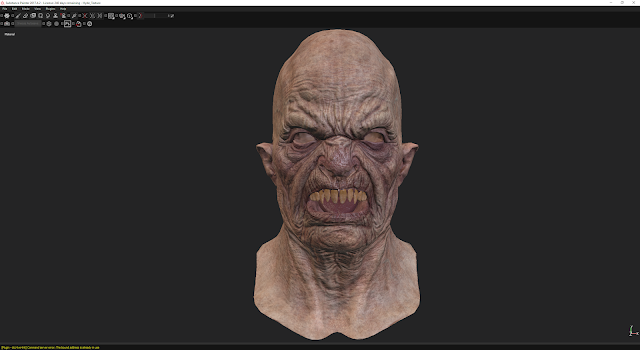
Hyde Texture Start After the sculpt was finalised, it was just a case of redoing the UVs for Hyde's head and hand and mouth, as the geometry was all the same, then baking and texturing in Substance Painter. For the skin, I used the same methods and techniques that I employed with Jekyll. For reference, I found that elderly people's faces offered really good details and colour information that worked well with the look I was after.

Hyde Turnarounds

Image

Hyde Hands

Image
Hyde Hands For Hyde's hands, it was just a case of using the same method as sculpting his head. I used Jekyll's finished hand model and altered and deformed it to fit Hyde's character. I found a lot of useful reference of hands and bone conditions to help achieve my result, one example being Rheumatoid Arthritis.  Moodboard for Hyde's hands: Hyde's hands sculpt process, starting with Jekyll's finished hand model: As the model had subdivision and was already unwrapped, I decided to do a test bake to ensure that the detail would show well on the low poly mesh.

Hyde Sculpt Continued

Image
Hyde Sculpt Continued Moving on, I kept refining and altering the sculpt to achieve the look I wanted Hyde to have. I new from the start that I wanted to make Hyde sinister looking, with heavy, damaged skin and sharp teeth. I also plan on making the final character hunched and distorted to help change the silhouette and give a clearer distinction between the two characters. I played around with expressions such as shouting and snarling, as I would have the character look angry and in pain when I morph between the two.

Hyde Sculpt Start

Image
Hyde Sculpt Start As I had finalised the Jekyll sculpt and started texturing and material setup in Unreal, I could move onto sculpting Hyde using the same geometry as Jekyll. It was important to first finalise Jekyll as I needed to ensure that the geometry wasn't going to change as this would mean that the morph targets wouldn't work as the Vertex Numbering needed to be exactly the same. As it was just going to be the head and hands that I morphed, I started a new document with just the head and hand subtools as this saved on the polycount. As I worked on Jekyll with subdivisions, I was able to retain the skin micro and tertiary details in layers, meaning that the Hyde sculpt would already have a base of wrinkle and pore details to work with for the high poly. I already had a pretty clear idea in my head as to what I wanted Hyde to look like, so I collated a more in-depth moodboard of reference to help me achieve the desired result. I found that the Gobli...

Skin Texture In Unreal

Image
Skin Texture In Unreal For the skin in Unreal Engine, I decided to utilise Saurabh Jethani's skin shader found here:  https://texturing.xyz/pages/saurabh-jethani-creating-realistic-skin-in-ue4 The shader is free to use and Saurabh talks about the setup and breaks down what each part does. The shader itself is an adaptation of the skin shader from the 'Meet Mike' project demo. The skin is still a WIP as I am still texturing as I go however Saurabh Jethani's shader is a great help and offers a lot of customisation. The eyes are from the Meet Mike project however I plan on swapping out the textures with my own at a later point.

Outfit Retopology and Unwrapping

Image
Outfit Retopology and Unwrapping After getting the base skin texture done for Jekyll, I moved on to finalising the low poly clothing and boots and then unwrapping and packing them. As I had already done most of the low poly work on the clothes from earlier, I just had to go and tweak some points and add a few cuts in places to make sure that it baked well. For the boots, I used 3DS Max's Freeform tools to create the low poly model. As for the laces, I decided that the bulk of them I would use flat geometry as they are barely visable from a distance and it saved a lot of Tris. As it stands, the Tri count for the whole outfit is at 18,623 Tris. I divided the UVs up into 3 texture sets as it was too much to pack into one and this way I had more control over what resolution I wanted each set to be.